
Creating Microservices With Go — Part 1
Coming from a JavaScript background, I have always wanted to learn a static-typed programming language, earlier this year I picked up Golang after reading the reviews about the language, Golang is backed by Google. Oh, and of course popular DevOps tools such as Docker, Kubernetes, Terraform, are built with Golang. After picking up the basics from this awesome tutorial by freecodecamp, I decided to build a production-level microservices architecture. This project will have unit tests, CI/CD integration, and robust architecture which can be expanded upon in the future. The frontend will be written in React.
This will be a multipart blog that documents the creation of the whole architecture. The code will be hosted here: https://github.com/nandangrover/go-microservices . The first part of the series, which is what this blog documents can be found in this branch . I will be using Ubuntu for the series but golang sits well with other OS as well so it shouldn’t be a problem.
My code editor of choice is the visual studio and I recommend you to use that. It has a number of benefits out of the box. Visual Studio Code supports Go syntax highlighting out of the box. Additional features are provided by the vscode-go plugin, which integrates with more than a dozen standard Go tools. If you don’t have your GOPATH set, the plugin will ask you to set it as soon as you try to edit a Go language file; you can set it for the project and/or the system environment. If you don’t have the Go tools installed, the plugin will ask to install them in the standard places as determined by your GOPATH.
What’s the file structure like?
My go workspace separates out the go binaries and my personal projects. This, in my opinion, makes the workspace a lot less cluttered. We will make use of the GOPATH **environment variable to form such a workspace.
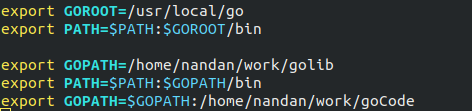
As you can see in the image above, the go libraries/binaries are stored in the golib folder whereas our personal projects will be stored in the goCode.
Now let’s look at the goCode folder. It consists of a go-microservices directory which is pushed on git under the same name.
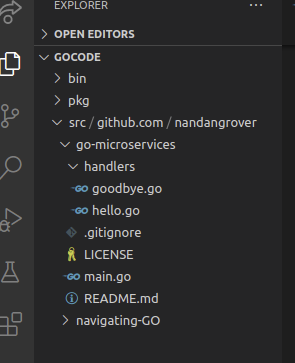
It contains a main.go file and a folder called handlers. We have our gitgnore and a README.md for the GitHub.
Dive into the code
Let’s look at our main.go file, which contains the logic to build two simple microservices — hello and goodbye.
func main() {
 l := log.New(os.Stdout, "product-api", log.LstdFlags)
 hh := handlers.NewHello(l)
 gh := handlers.NewGoodbye(l)

sm := http.NewServeMux()
 sm.Handle("/", hh)
 sm.Handle("/goodbye", gh)

s := &http.Server{
  Addr:         ":9090",
  Handler:      sm,
  IdleTimeout:  120 * time.Second,
  ReadTimeout:  1 * time.Second,
  WriteTimeout: 1 * time.Second,
 }
 // wrapping ListenAndServe in gofunc so it's not going to block
 go func() {
  err := s.ListenAndServe()
  if err != nil {
   l.Fatal(err)
  }
 }()

// make a new channel to notify on os interrupt of server (ctrl + C)
 sigChan := make(chan os.Signal)
 signal.Notify(sigChan, os.Interrupt)
 signal.Notify(sigChan, os.Kill)

// This blocks the code until the channel receives some message
 sig := <-sigChan
 l.Println("Received terminate, graceful shutdown", sig)
 // Once message is consumed shut everything down
 // Gracefully shuts down all client requests. Makes server more reliable
 tc, cancel := context.WithTimeout(context.Background(), 30*time.Second)
 defer cancel()
 s.Shutdown(tc)
}
We start off by creating a new logger by calling log.New. We can have multiple loggers in the future so we create a simple logger with the name product-api to start with.
The next step is to initialize our Handlers with the logger. Handlers are our custom methods that implement the Handler interface. Internally, in the http module, the Handler interface implements the ServeHTTP method, which in turn accepts a http.ResponseWriter and a pointer to *http.Request. Golang has documented the http server really well and you can look at the handler interface in their official documentation to understand the internal working of http module better.
Running our Server and the ServeMux
Instead of creating a new server using http.ListenAndServe(“:9090”), we make use of the seldom-used NewServeMux function in combination with a pointer to http.Server to customize our server. NewServeMux as the name describes returns a ServeMux.
ServeMux is an HTTP request multiplexer. It matches the URL of each incoming request against a list of registered patterns and calls the handler for the pattern that most closely matches the URL. You can read more about it in the official docs .
sm := http.NewServeMux()
sm.Handle("/", hh)
sm.Handle("/goodbye", gh)

s := &http.Server{
  Addr:         ":9090",
  Handler:      sm,
  IdleTimeout:  120 * time.Second,
  ReadTimeout:  1 * time.Second,
  WriteTimeout: 1 * time.Second,
 }
 // wrapping ListenAndServe in gofunc so it's not going to block
 go func() {
  err := s.ListenAndServe()
  if err != nil {
   l.Fatal(err)
  }
 }()
A Server defines parameters for running an HTTP server. After initializing it with our initial parameters we invoke the ListenAndServe function. This starts up our http server in the specified port, which at the moment is 9090. Why do we wrap this up in a goroutine? ListenAndServe is a blocking code. It blocks the process so anything below that line won’t be executed. Goroutines are inherently non-blocking. This way a server can be started up in a separate CPU process. This is also the first step we have to take in order to run multiple servers in Go.
💡 Unlike http.ListenAndServe(addr string, handler Handler) method call, the server.ListenAndServe () method call does not need any arguments since the configuration of the server is present in the server struct itself. The server.ListenAndServe function internally creates a tcp listener on address addr using net.Listen function which returns a net.Listener and uses it with server.Serve function to listen to incoming connections using the server.Handler field value (a ServeMux object).
Shutdown the server gracefully
Why is shutting down the server gracefully important? Suppose a client has sent a request to save his image in the database. At the same time, we have to do some maintenance work and we shut down the server. The image is supposed to have multiple calls in the backend to process it. The first is to aws, to actually save it and get the file id and link. Suppose this part has finished executing but in order to register the image as saved we have to save that aws data in our internal database as well. At this point in time, the server stops. So the image is saved in aws but we don’t know that as the server stopped in the middle of executing a client request.
In order to prevent such a scenario from happening, we have to gracefully shutdown the server so that all the currently active client requests are handled.
Shutdown gracefully shuts down the server without interrupting any active connections. Shutdown works by first closing all open listeners, then closing all idle connections, and then waiting indefinitely for connections to return to idle and then shut down. If the provided context expires before the shutdown is complete, Shutdown returns the context’s error, otherwise, it returns any error returned from closing the Server’s underlying Listener(s).
In order to trigger a shutdown, we listen to the interrupt signal from the os. We create a go channel by passing in the os.Signal. Notify is used to register to Interrupt and Kill signals from the server.
Go channel is blocking by nature. So if we read the message from out sigChan, then it subsequently blocks all the code below it. Once we receive the interrupt signal, we print the shutdown message and create a timeout context for 30 seconds. We pass this on to our server.Shutdown function.
The shutdown method needs a base context of the incoming requests. If you haven’t configured the BaseContext field of the Server structure, you can use the context.Background () since it is the default value for the BaseContext field.
// make a new channel to notify on os interrupt of server (ctrl + C)
 sigChan := make(chan os.Signal)
 signal.Notify(sigChan, os.Interrupt)
 signal.Notify(sigChan, os.Kill)

// This blocks the code until the channel receives some message
 sig := <-sigChan
 l.Println("Received terminate, graceful shutdown", sig)
 // Once message is consumed shut everything down
 // Gracefully shuts down all client requests. Makes server more reliable
 tc, cancel := context.WithTimeout(context.Background(), 30*time.Second)
 defer cancel()
 s.Shutdown(tc)
Handlers
As mentioned before, Handlers are our custom methods that implement the Handler interface. The below code shows the creation of Hello handler. This is executed when a request is sent to localhost:9090. We can also send data. In Linux, we can do this easily by the following command curl -v localhost:9090 -d “World”
// Hello handler
type Hello struct {
 l *log.Logger
}

// NewHello Function which gives reference to Hello handler
func NewHello(l *log.Logger) *Hello {
 return &Hello{l}
}

func (h *Hello) ServeHTTP(rw http.ResponseWriter, r *http.Request) {
 h.l.Println("Hello world")
 d, err := ioutil.ReadAll(r.Body)

if err != nil {
  http.Error(rw, "Oops", http.StatusBadRequest)
  return
 }
 fmt.Fprintf(rw, "Hello %s\n", d)
}
We start off by defining a struct called Hello, with a type *log.Logger(pointer to logger module).
ServeHTTP is the method on Hello handler which is executed by the http/server module when we send a request to localhost:9090. The method currently only logs Hello world in the server logs. If some data is sent along, then ioutil reads it from the requests body and the http.ResponseWriter is used to print the data as a response.
Conclusion
We have created a very basic http server in go which can be used to further create more APIs in a standardized format. The graceful shutdown was implemented with the use of go channels. We can look forward to creating RESTful services in the next part of the blog.
References
-
Part 1 github link: https://github.com/nandangrover/go-microservices/tree/microservices_basic_1
-
Freecodecamp tutorial for golang: https://www.youtube.com/watch?v=YS4e4q9oBaU&ab_channel=freeCodeCamp.org
-
Server documentation for golang: https://golang.org/src/net/http/server.go
-
ServerMux: https://golang.org/pkg/net/http/#ServeMux Creating RESTful services with Go — Part 2 *In this blog, we are going to be building a fully-fledged REST API that exposes GET, POST, DELETE and PUT endpoints…*medium.com
Related Posts
Building a CI Pipeline using Github Actions for Sharetribe and RoR
Continuous Integration (CI) is a crucial part of modern software development workflows. It helps ensure that changes to the codebase are regularly integrated and tested, reducing the risk of introducing bugs and maintaining a high level of code quality.
Read more
Exploring if Large Language Models possess consciousness
As technology continues to advance, the development of large language models has become a topic of great interest and debate. These models, such as OpenAI’s GPT-4, are capable of generating coherent and contextually relevant text that often mimics human-like language patterns.
Read more
Fine-Tuning Alpaca: Enabling Communication between LLMs on my M1 Macbook Pro
In this blog post, I will share a piece of the work I created for my thesis, which focused on analyzing student-tutor dialogues and developing a text generation system that enabled communication between a student chatbot and a tutor chatbot.
Read more